Renewing an insurance license through NIPR is designed to be straightforward, but being prepared with the right information and understanding the process can save you time and prevent delays. This guide walks you through the renewal process for both resident and non-resident licenses, outlines what you’ll need, and offers troubleshooting tips.
Before you begin
As a starting point, we recommend checking your requirements to ensure that you have all proper documentation, education, and other relevant details in order before attempting to renew your license. Once you are ready to begin the renew process, you can use LicenseHub to do so.
Review key timelines and requirements
You can find deadlines, fees, and requirements for your license using NIPR’s State Requirements page. In the first field, select License Renewal, and then indicate your state, residence status, role, and whether you are an individual or business entity.
When you find your requirements page, note that:
- Renewal windows vary by state, typically opening 60–120 days before license expiration.
- Resident and non-resident licenses usually expire every 2 years, but the exact timing depends on your state.
- Some states allow late renewal with penalties. Others require reapplication if you miss the deadline.
- If there are any continuing education (CE) requirements for your license, complete them at least 30 days before your license expires to allow time for processing.
- Submit renewals early to avoid system delays or rejections, especially at the end of the month when wait times are longer.
- In addition to any state fees listed, NIPR charges a transaction fee (currently $5.60).
- If your license expires before you can renew, you may need to reapply as a new agent, renew during a grace period (if available), or wait out a cancellation period, depending on your state. Late fees and reinstatement costs vary by state.
Tip: Schedule annual reminders for all licenses you hold.
Check continuing education credits against the requirements
Most states require CE completion before you can renew. To find your CE transcripts for your state, visit the Continuing education transcripts page for more details.
Note:
- It can take 3–5 business days for CE results to be reported to the state and NIPR.
- Meeting your home state’s CE requirements often satisfies other states’ requirements due to reciprocity, but always verify.
Ensure contact information is up-to-date
If you need to update your contact information, you must do this prior to renewing our license. Please allow enough time for the state to update their records. Typically updates take no more than a few days. For guidance on reviewing your contact information and making necessary updates, see Update your contact information.
Gather required information
Before you begin, make sure you have the following details ready:
Renewing a license
Note:
The following instructions assume you’re applying for your own license. If you’re working on someone else’s behalf, enter their information wherever it says “your”.
If you need to add a line of authority (LOA) to your license, this will require a separate application. You can only renew existing LOAs during the renewal process. Wait until your renewal has processed, then add the new LOA.
Step 1: Sign in
Once you have logged in to LicenseHub, you'll see a dashboard with any in-progress applications listed under Incomplete orders and recently submitted applications listed under Order history. If you don't see any orders in the Order history, that means you haven't requested a license through NIPR before. However, you can still renew a valid existing license using our tool.
Step 2: Create an application to renew your license
- In the left navigation menu, click Start Application.
- Select either producer, adjuster, or other. Click Next.
- Select Renewal as your intended action and click Next.
- Select the relationship you have with the state for which you are applying: a resident, a non-resident, or as someone does not have a home state (resident state) on record. Click Next.
- Enter the state for your license and click Next.
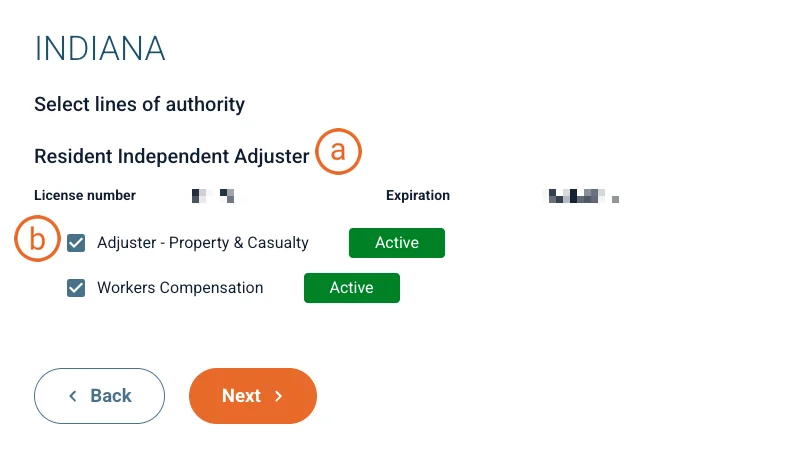
Note: This list is filtered to show only states where you have active licenses. If no states are available for selection, contact NIPR for assistance. - You will see any applicable license classes (A) for your existing license, with any associated lines of authority (LOAs) (B) listed underneath. Review them to make sure you have the correct license classes and LOAs listed, then click Next.
Note: If you need to add a line of authority (LOA) to your license, this will require a separate application. You can only renew existing LOAs during the renewal process. Wait until your renewal has processed, then add the new LOA.
- Do not submit the renewal without the correct license class and LOAs listed. If you need to change the license classes listed, contact NIPR for assistance.
- Some states allow you to partially renew your license, leaving out LOAs from the renewal. If this is the case, you can de-select the LOAs you no longer want or need.
- Certain license classes may require an LOA. You will not be able to proceed without them selected.
- If no LOA applies, you should see None/Not Applicable. You must leave this selected.
- Review your fee summary, then click Next.
Important: You cannot retroactively apply these fees to a different LOA. Check one last time to ensure you have the correct license classes and LOAs listed.
Your application has been created. After this point, if you need to pause your application, it will be automatically saved for later. You can find it again on the dashboard under “Incomplete Orders”.
Step 3: Ensure personal information is updated for the license application
The following instructions assume you’re applying for your own license. If you’re working on someone else’s behalf, enter their information wherever it says “your”.
Review your personal and contact information.
- If you have multiple addresses per type (resident, business and mailing), indicate which address applies to this application.
Note: If your addresses are incorrect, you must update your contact information first and then restart the application. For guidance on reviewing your contact information and making necessary updates, see Update your contact information. - Make any necessary updates to phone, email, and website information.
- If you have multiple addresses per type (resident, business and mailing), indicate which address applies to this application.
Make any necessary updates for new or outdated affiliations with insurance companies or agencies under Affiliations. If adding an affiliation, you will need to enter the agency’s name and Federal Employer Identification Number (FEIN).
Note: Your state may not require affiliations.
Step 4: Answer background questions and complete the license application
If you answer "Yes" to any background question, you will see a last background question about supporting documentation that tells you you are required to enter supporting documentation related to any conviction sanction, or legal action.
Note: You will do this after submitting your application.
Step 5: Submit and pay for a license renewal application
If your state requires any additional actions for your application, you will see a message displayed at this point with instructions. You will also have the option at this point to print or download your receipt, as well as a PDF copy of your application.
Step 6: Provide necessary supporting documentation for your application
If you are using NIPR to upload supporting documentation for a background question, use this link to access Background Questions Supporting Documentation. Then do one of the following: For more guidance, see Submit Background Questions Supporting Documents.
Updating an incomplete renewal
To continue an application you previously started: To delete an application you previously started: