
Navigating the insurance licensing process doesn’t have to be difficult—especially when you understand the key requirements and give yourself enough time to get everything done. Whether you're just starting or need to renew your license, this guide will walk you through the basics of becoming a licensed insurance professional.
NIPR is here to help insurance professionals navigate the licensing process across the country. If you conduct business in multiple states, it’s essential to understand the specific requirements in each state to ensure compliance.
For some states, these steps may apply to reinstating a license.
Before you begin
As a starting point, we recommend checking your requirements to ensure that you have all proper documentation and other relevant details in order before attempting to apply for a license.
Review key timelines and requirements
Insurance licensing requirements are decided by the state. Additional requirements may be applicable based on the line of authority you wish to apply for.
Line of authority (LOA): the type or category of insurance you’re licensed to sell (for example, Life, Accident & Health, or Property & Casualty).
In most states, to be eligible for an insurance producer license you must:
- Be at least 18 years old (minimum age in most states).
- Complete any required background check.
- Be current on federal and state tax obligations.
- Be current on child support obligations (if applicable).
- Meet your state’s standards related to criminal history, fraud, or other regulatory actions.
- Complete any required pre-licensing education (topics and minimum hours vary by state and line of authority (LOA). If you’re applying for multiple LOAs, you may need education for each one).
- Schedule and pass your state’s insurance licensing exam
Before you apply, review your state’s requirements and plan for any steps that must be completed in advance, such as education, exams, or a background check. You can review state-specific details using NIPR’s State Requirements page. Select First time license / New license / Reinstatement / Add line of authority, then choose your state, residency status, role, and whether you are an individual or business entity.
Note: As you review the requirements page, keep in mind that in addition to state fees, you will be charged NIPR’s transaction fee (currently $5.60).
Ensure contact information is up-to-date
If you need to update your contact information, you must do this prior to renewing our license. Please allow enough time for the state to update their records. Typically updates take no more than a few days. For guidance on reviewing your contact information and making necessary updates, see Update your contact information.
Gather required information
Before you begin, make sure you have the following details ready:
Applying for a license
The following instructions assume you’re applying for your own license. If you’re working on someone else’s behalf, enter their information wherever it says “your”.
Tip: After your state’s insurance licensing exam scores are released, wait at least 48 hours before submitting your initial licensing application so results have time to be processed.
Step 1: Sign In
Important: Before applying for a business entity license, make sure that there is no other business entity producer for your organization that holds this license.
- Go to LicenseHub.
- Click the option that applies to you, either Individual or Business entity.
- Select how you’d like to identify the licensee, then enter the required details:
- National Producer Number (NPN): Learn how to find your NPN
- License number: You must also enter your state
- Social Security Number (SSN): This applies only to individuals and you must also enter your last name
- Federal Employer Identification Number (FEIN): This applies only to business entities
- Accept the user agreement.
- Provide your date of birth. If you are using NPN or license number for identification, you must also provide the last four digits of your SSN.
- Click Next.
- Go to LicenseHub.
- Click the option that applies to you, either Individual or Business entity.
- Select how you’d like to identify the licensee, then enter the required details:
- National Producer Number (NPN): Learn how to find your NPN
- License number: You must also enter your state
- Social Security Number (SSN): This applies only to individuals and you must also enter your last name
- Federal Employer Identification Number (FEIN): This applies only to business entities
- Accept the user agreement.
- Provide your date of birth. If you are using NPN or license number for identification, you must also provide the last four digits of your SSN.
- Click Next.
Step 2: Create an application for your license
- In the left navigation menu, click Start Application.
- Select either producer, adjuster, or other, then click Next.
- Select Initial as your intended action, then click Next.
- Select the relationship you have with the state for which you are applying: a resident, a non-resident, or a non-resident who does not have a home state (resident state) on record. Click Next.
- Enter the state for your license, then click Next.
- You will see a list of license classes (A), with applicable LOAs (B) listed underneath. Select the lines of authority you need, then click Next.
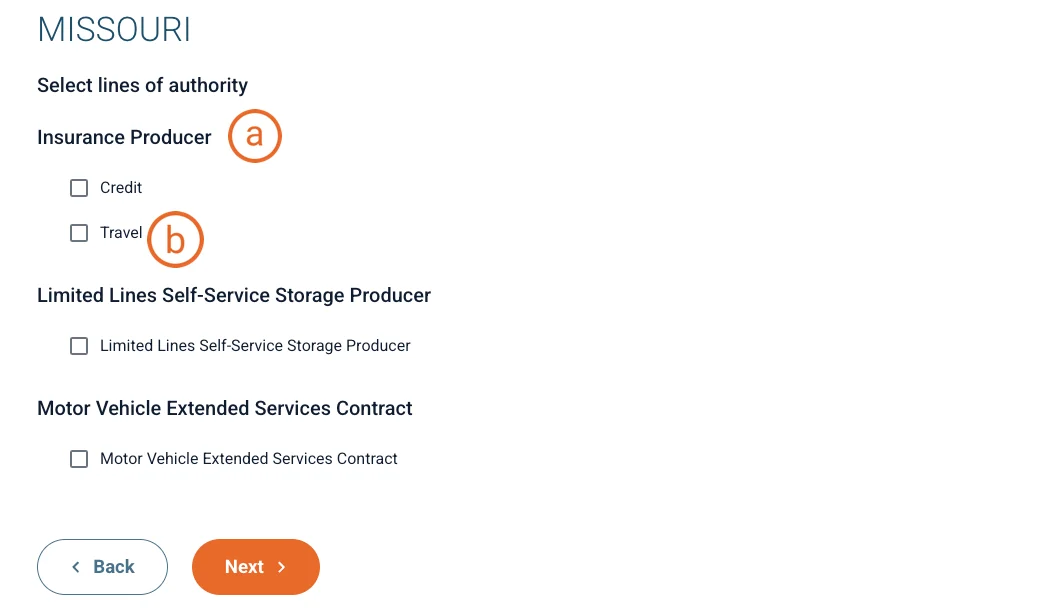
Note: - If this is a resident license application, you can only apply for one license class at a time. To apply for lines of authority under multiple license classes, you must submit multiple applications.
- If no LOA applies, you might see None/Not Applicable. You must select this.
- You cannot re-register for any LOAs for which you are already licensed.
- Review your fee summary, then click Next.
Important: - Check one last time to ensure you have the correct license classes and LOAs listed. You cannot retroactively apply these fees to a different LOA.
- If you receive a duplicate application warning, stop the application process and contact us to determine the cause of the warning and to prevent duplicate fee payments, which are not refundable.
Your application has been created. After this point, if you need to pause your application, it will be automatically saved for later. You can find it again on the dashboard under “Incomplete Orders”.
Step 3: Ensure personal information is updated for the license application
The following instructions assume you’re applying for your own license. If you’re working on someone else’s behalf, enter their information wherever it says “your”.
Review your personal and contact information.
- If you have multiple addresses per type (resident, business and mailing), indicate which address applies to this application.
Note: If your addresses are incorrect, you must update your contact information first and then restart the application. For guidance on reviewing your contact information and making necessary updates, see Update your contact information. - Make any necessary updates to phone, email, and website information.
- If you have multiple addresses per type (resident, business and mailing), indicate which address applies to this application.
- Under Aliases, enter any alternate names, DBAs (“doing business as”), trade names, or assumed names you use in the course of your insurance business.
Make any necessary updates for new or outdated affiliations with insurance companies or agencies under Affiliations. If adding an affiliation, you will need to enter the agency’s name and Federal Employer Identification Number (FEIN).
Note: Your state may not require affiliations.- Ensure the Employment History section contains all relevant information for the last five years.
Step 4: Answer background questions and complete the license application
If you answer "Yes" to any background question, you will see a last background question about supporting documentation that tells you you are required to enter supporting documentation related to any conviction sanction, or legal action.
Note: You will do this after submitting your application.
Step 5: Submit and pay for a license application
If your state requires any additional actions for your application, you will see a message displayed at this point with instructions. You will also have the option at this point to print or download your receipt, as well as a PDF copy of your application.
Step 6: Provide necessary supporting documentation for your application
If you are using NIPR to upload supporting documentation for a background question, use this link to access Background Questions Supporting Documentation. Then do one of the following: For more guidance, see Submit Background Questions Supporting Documents.
Updating an incomplete application
To continue an application you previously started: To delete an application you previously started: